No products in the cart.

365 Archery 3D Archery Targets
When folks enter a new industry, or even a new subsection of their industry, they usually dip their toe in by offering one or two


I’ve seen the question posted many times on archery internet forums. You just received a new, or new to you, Spot Hogg sight and can’t find sight tape installation instructions anywhere. Well, you have come to the right spot!
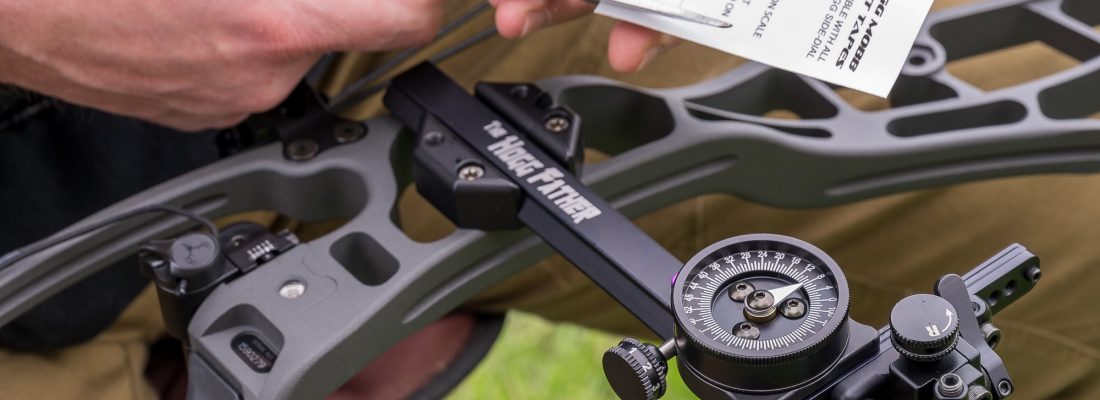
Turkey season is fast approaching and it is time to get my bow setup and sighted in. Setting up my Spot Hogg “The Hogg Father” Hogg Mob bow sight is as simple as following the steps below. You’ll need your bow, Spot Hogg sight (installed) and a set of Hogg Mobb sight tapes. In addition, you’ll need your arrows, a target and your release too.
First, spend time getting the strings settled and then getting the bow tuned. Do this before even thinking about putting a sight tape on your Spot Hogg sight. Use whatever tuning method you like to use in order to get your setup shooting darts. I skip the paper tuning all-together. Instead, I start by doing walk back tuning or a modified walk back tune called modified french tuning. Modified french tuning works great if the weather is bad and I need to shoot inside. If you don’t know what modified french tuning is, comment below and I’ll write something up in the near future.
Sight your bow in at 20 yards after you’ve completed step one above. You are likely pretty close to being sighted in by using walk back or modified french tuning for your method of tuning in Step #1. Spend some time behind your bow and make sure you are shooting tight/consistent groups at 20 yards before moving on to Step #3.
Three (3) calibration tapes are included with the Hogg Mobb sight tapes. In Step #2 above, you sighted your bow in at 20 yards. Simply cut out one (1) of the calibration tapes using scissors or a sharp knife along the outer thin line.
There is a line towards the top of the calibration tape with a “20” line and a group of red/black lines below it with numbers next to them. For now, we are only interested in the “20” line at top. Line up the “20” line at the top of the calibration tape with the pointer pin on the back of the Hogg Mobb sight.
If you don’t have any calibration tapes, don’t fret. The process will be a little different, but you can still figure out which sight tape you will need to use. Simply tape a piece of thin paper to the back of your sight’s yardage wheel. Mark with a pencil or pen where your sight pointer is at when sighted in at 20 yards.
With the calibration tape installed, step off, or use a range finder (preferred), to get back to a distance of 60 yards from your target. Next, move the sight yardage wheel on your Spot Hogg sight until your pointer pin is somewhere in the middle of all of the red/black lines. Remember that you are using the same pointer pin you used when shooting/sighting in at 20 yards. Putting the pointer pin somewhere in the middle of the black/red lines should get you on target when you step back to 60 yards.
Faster bow/arrow setups should be closer to the top of the red/black lines while slower setups will be towards the bottom of the sight tape. If you don’t want to chance missing the target on your first shot at 60, you can always incrementally move back while shooting and adjusting your sight as you go. Doing so will hopefully keep you from loosing a couple arrows in the process.
Move the wheel whichever direction you need to go to get your group hitting what you are aiming at. If your groups are hitting high at 60 yards, rotate the yardage dial counter-clockwise (towards the 20 yard mark). Move the yardage dial clockwise if you are hitting low.
The pointer pin on your yardage wheel will be pointing to a color line with a number next to it. The number corresponds to a sight tape included in the Hogg Mobb sight tape pack you received with your sight. If you aren’t using the calibration tapes, place another mark on your piece of paper/makeshift calibration tape after you’ve dialed in at 60 yards. Finally, move your sight back to your 20 yard mark on the calibration tape.
First, find your sight tape number in the packet of Hogg Mobb sight tapes. Then cut it out following the outside lines around that tape. The tape has two sets of yardage numbers running along the outside. One set on the left and one set on the right. I keep my yardage numbers on the right hand side of the sight tape (I’m a right handed shooter) so the pointer pin on my Hogg Father doesn’t block the number. Cut off one set of the numbers in order for the sight tape to fit the channel on the yardage dial.
If using the makeshift calibration tape, pull off your paper tape and line up your 20 and 60 marks with the sight tapes to find the right one.
Finally, peel off the calibration tape and clean the yardage wheel to remove any residue from the calibration tape. Using “Goo Gone” or a similar product and a cotton swab, remove any leftover sticky residue. Now you are ready to install your new tape. Start by peeling off the backing of the new sight tape. Align the top pointer pin with the 20 yard mark on the sight tape, and place it on the yardage dial.
Verify you’ve selected the right sight tape by getting out and shooting at various distances to confirm your marks. Walk up a random amount and range the target. Adjust the sight according to your rangefinder and let it rip! Your arrow should find its mark at all distances if you’ve followed the steps correctly.
That’s how easy it is to install a Spot Hogg sight tape!

When folks enter a new industry, or even a new subsection of their industry, they usually dip their toe in by offering one or two

Highlights of Greylight’s new releases for 2024 – the Daybreak Blind, Transformer Tower, and Nomad trailer.

With one of their coolest decoys to date, the NWTF floor was buzzing with talk of the new DSD Preening Hen decoy. It’s almost TOO
Don’t miss a thing! Subscribe below to keep informed on everything that’s happening with the folks at SELFILMED.com